
Step-by-Step Guide to Install Gym Rubber Flooring Tiles in Dubai – Fab Floorings Dubai
Creating the perfect workout space at home or in a commercial gym begins with a strong, durable foundation. Gym rubber flooring tiles are an excellent choice for their versatility, durability, and easy installation. At Fab Floorings Dubai, we provide premium-quality gym flooring solutions to ensure your fitness area is safe, comfortable, and stylish.
In this comprehensive guide, we’ll walk you through the process of installing gym rubber flooring tiles, helping you achieve a professional finish without the need for extensive tools or expertise.
Why Choose Rubber Flooring Tiles?
Rubber flooring tiles are an ideal choice for gyms because of their many advantages:
- Durability: Built to withstand the pressure of heavy equipment and intense workouts.
- Shock Absorption: Reduces impact on joints and minimizes equipment damage.
- Noise Reduction: Muffles sound from dropped weights or foot traffic.
- Easy Maintenance: Resistant to sweat, stains, and water, making them hygienic and low-maintenance.
- DIY-Friendly Installation: Interlocking tiles are designed for easy setup without professional help.
Tools and Materials Needed for Installation
Before starting, gather these essential tools and materials:
- Rubber Flooring Tiles: Choose the right thickness and design from Fab Floorings Dubai.
- Measuring Tape: For accurate space measurements.
- Utility Knife: To trim tiles for a perfect fit.
- Straight Edge or Ruler: Ensures precise cutting of tiles.
- Chalk or Marker: To mark cutting lines.
- Vacuum or Broom: For cleaning the subfloor before installation.
- Rubber Mallet: To secure interlocking tiles into place.
- Adhesive (Optional): For permanent installations, especially in high-traffic areas.
Step-by-Step Installation Guide
Step 1: Prepare the Subfloor
- Clean the Area: Remove dust, dirt, and debris using a broom or vacuum. A clean subfloor ensures proper adhesion and stability.
- Check for Leveling: Ensure the surface is flat and even. Uneven areas should be smoothed out before proceeding.
- Dry the Floor: Moisture can affect the performance of rubber flooring, so ensure the subfloor is completely dry.
Step 2: Measure the Space
- Measure the Dimensions: Use a measuring tape to calculate the area to be covered.
- Plan the Layout: Visualize how the tiles will fit, starting from one corner and working outward.
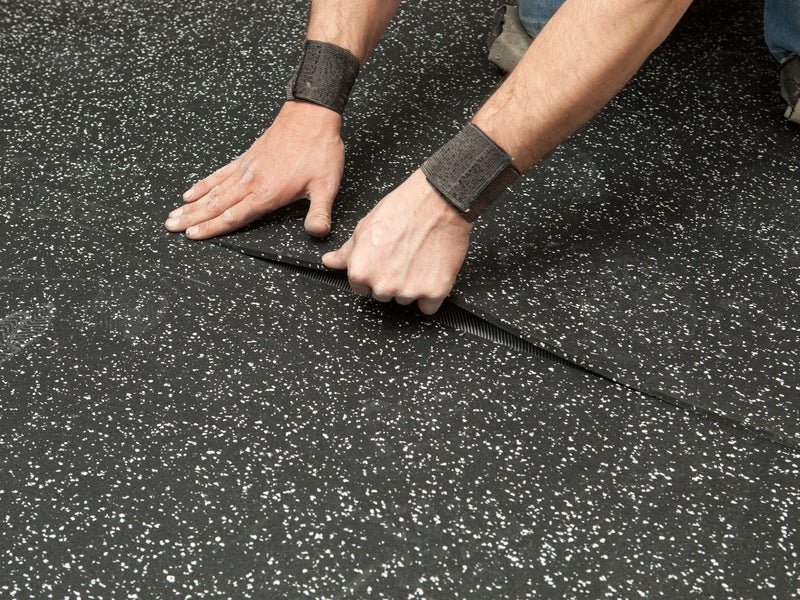
Step 3: Start Laying the Tiles
- Begin in a Corner: Start in a corner of the room for the most seamless installation.
- Align the Tiles: Place the first tile against the walls and ensure it aligns perfectly.
- Interlock the Tiles: Use the interlocking edges to connect the tiles securely. Tap them gently with a rubber mallet for a snug fit.
Step 4: Trim Tiles for Edges and Corners
- Mark the Cutting Line: Use chalk or a marker to outline where the tile needs trimming.
- Cut the Tiles: Using a utility knife and straight edge, carefully cut along the marked line.
- Fit the Tiles: Place the trimmed tiles against the walls or corners for a seamless finish.
Step 5: Secure the Installation
- For Temporary Installations: Interlocking tiles don’t require adhesive, making them easy to remove or reposition.
- For Permanent Installations: Apply adhesive to the subfloor and press the tiles firmly into place. Follow the adhesive manufacturer’s instructions for the best results.
Step 6: Final Touches
- Inspect the Flooring: Check for gaps, misaligned edges, or loose tiles.
- Clean the Surface: Wipe the flooring with a damp cloth to remove any dust or residue.
Maintenance Tips for Rubber Flooring
To keep your rubber flooring in top condition:
- Regular Cleaning: Sweep or vacuum the flooring daily to remove dirt and debris.
- Spot Cleaning: Wipe spills or stains immediately with a damp cloth.
- Deep Cleaning: Use a mild detergent and warm water for thorough cleaning every few weeks.
- Avoid Harsh Chemicals: Strong chemicals can damage the rubber surface. Stick to recommended cleaners.
- Prevent Damage: Avoid dragging heavy equipment across the floor to prevent scratches or dents.
Why Choose Fab Floorings Dubai?
As a leading manufacturer and supplier of gym flooring solutions in Dubai, Fab Floorings Dubai offers:
- Premium Quality Products: Our rubber flooring tiles are durable, slip-resistant, and eco-friendly.
- Customizable Options: Available in various colors, thicknesses, and designs to suit your space.
- Expert Guidance: Our team helps you select the perfect flooring based on your needs.
- Affordable Prices: We provide top-notch products at competitive rates.
- Fast Delivery: Get your flooring tiles delivered to your doorstep across Dubai and the UAE.
Frequently Asked Questions
Q1: Can I install rubber flooring tiles on any surface?
Yes, rubber flooring tiles can be installed on concrete, wood, or tiles, provided the surface is clean, dry, and level.
Q2: How thick should my gym flooring be?
For home gyms, a thickness of 8mm to 12mm is ideal for most activities. If you use heavy equipment, consider 15mm or more.
Q3: Are rubber flooring tiles eco-friendly?
Fab Floorings Dubai uses recycled materials in our products, making them an environmentally conscious choice.
Q4: Do I need a professional for installation?
No, our interlocking rubber tiles are designed for easy DIY installation.
Watch Full Video
- Request a Quote